Manuale per l'amplificatore Myriad
Chapter I: About The Myriad
1.1 Introduction
The Myriad is a state-of-the-art amplifier that uses a microcontroller and digital signal processing (DSP) to accomplish a variety of tasks. This product has been designed for flexibility of use and ease of installation; use the default settings built into the amplifier or customize the Myriad’s responses using the Baton software. The Myriad can be easily networked and communicated with remotely.
Myriads are custom configured at the factory with the features selected by the customer. Some of these features are Smart Volume, Sensor Play, SD card, Data Acquisition.
1.2 SmartVolume
The Smart Volume feature provides the ability for the amplifier to automatically adjust the volume depending on the ambient noise. Myriads that have been configured for Smart Volume will have a microphone input on the back of the amplifier. To utilize this feature a Brown Innovations microphone must be connected. This microphone may be built into a speaker or separate. By connecting the Myriad to a computer through the USB port the performance can be monitored and the configuration can be changed. A Windows based software called Baton is provide to make this communication easy.
Chapter 2: Installation
2.1 Unpacking and Inspection
Your Myriad was packed carefully to insure safe shipment. Please take a moment to inspect the contents of your Myriad. Be sure that you have the following:
- 1 - Myriad a)
- 1 - Software Installation CD b)
- 1 - Brown Innovations Power Supply (17VAC @ 1240mA)* c)
- 1 - USB Cable d)
- 1 - Audio Cable (stereo Mini to RCA) e)

*WARNING: Do not operate the Myriad with any other power supply. To do so could damage the unit and immediately renders the warranty void.
Chapter 3: Stand Alone Mode
3.1 Introduction
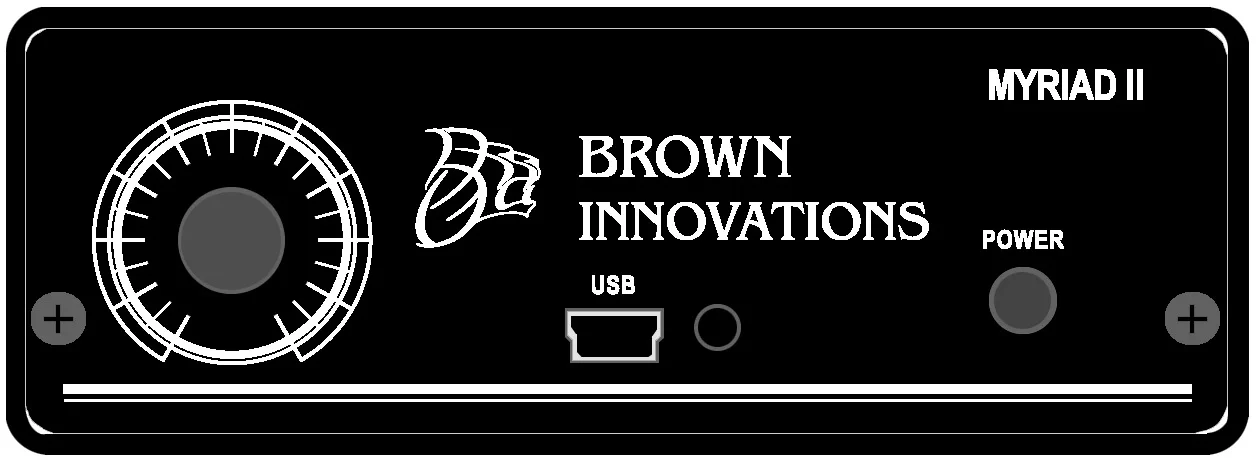
Your Myriad comes from the factory ready to connect to an audio source with no additional programming. The default presets are designed to accommodate the majority of operating environments. This mode of operation is referred to as Stand Alone Mode. After making the proper connections, Volume Offset can be adjusted using the potentiometer (volume knob) located on the front panel of the Myriad. This pot can also be disabled and set internally using a computer connections (covered in Ch.4 and 5).
3.2 Connections
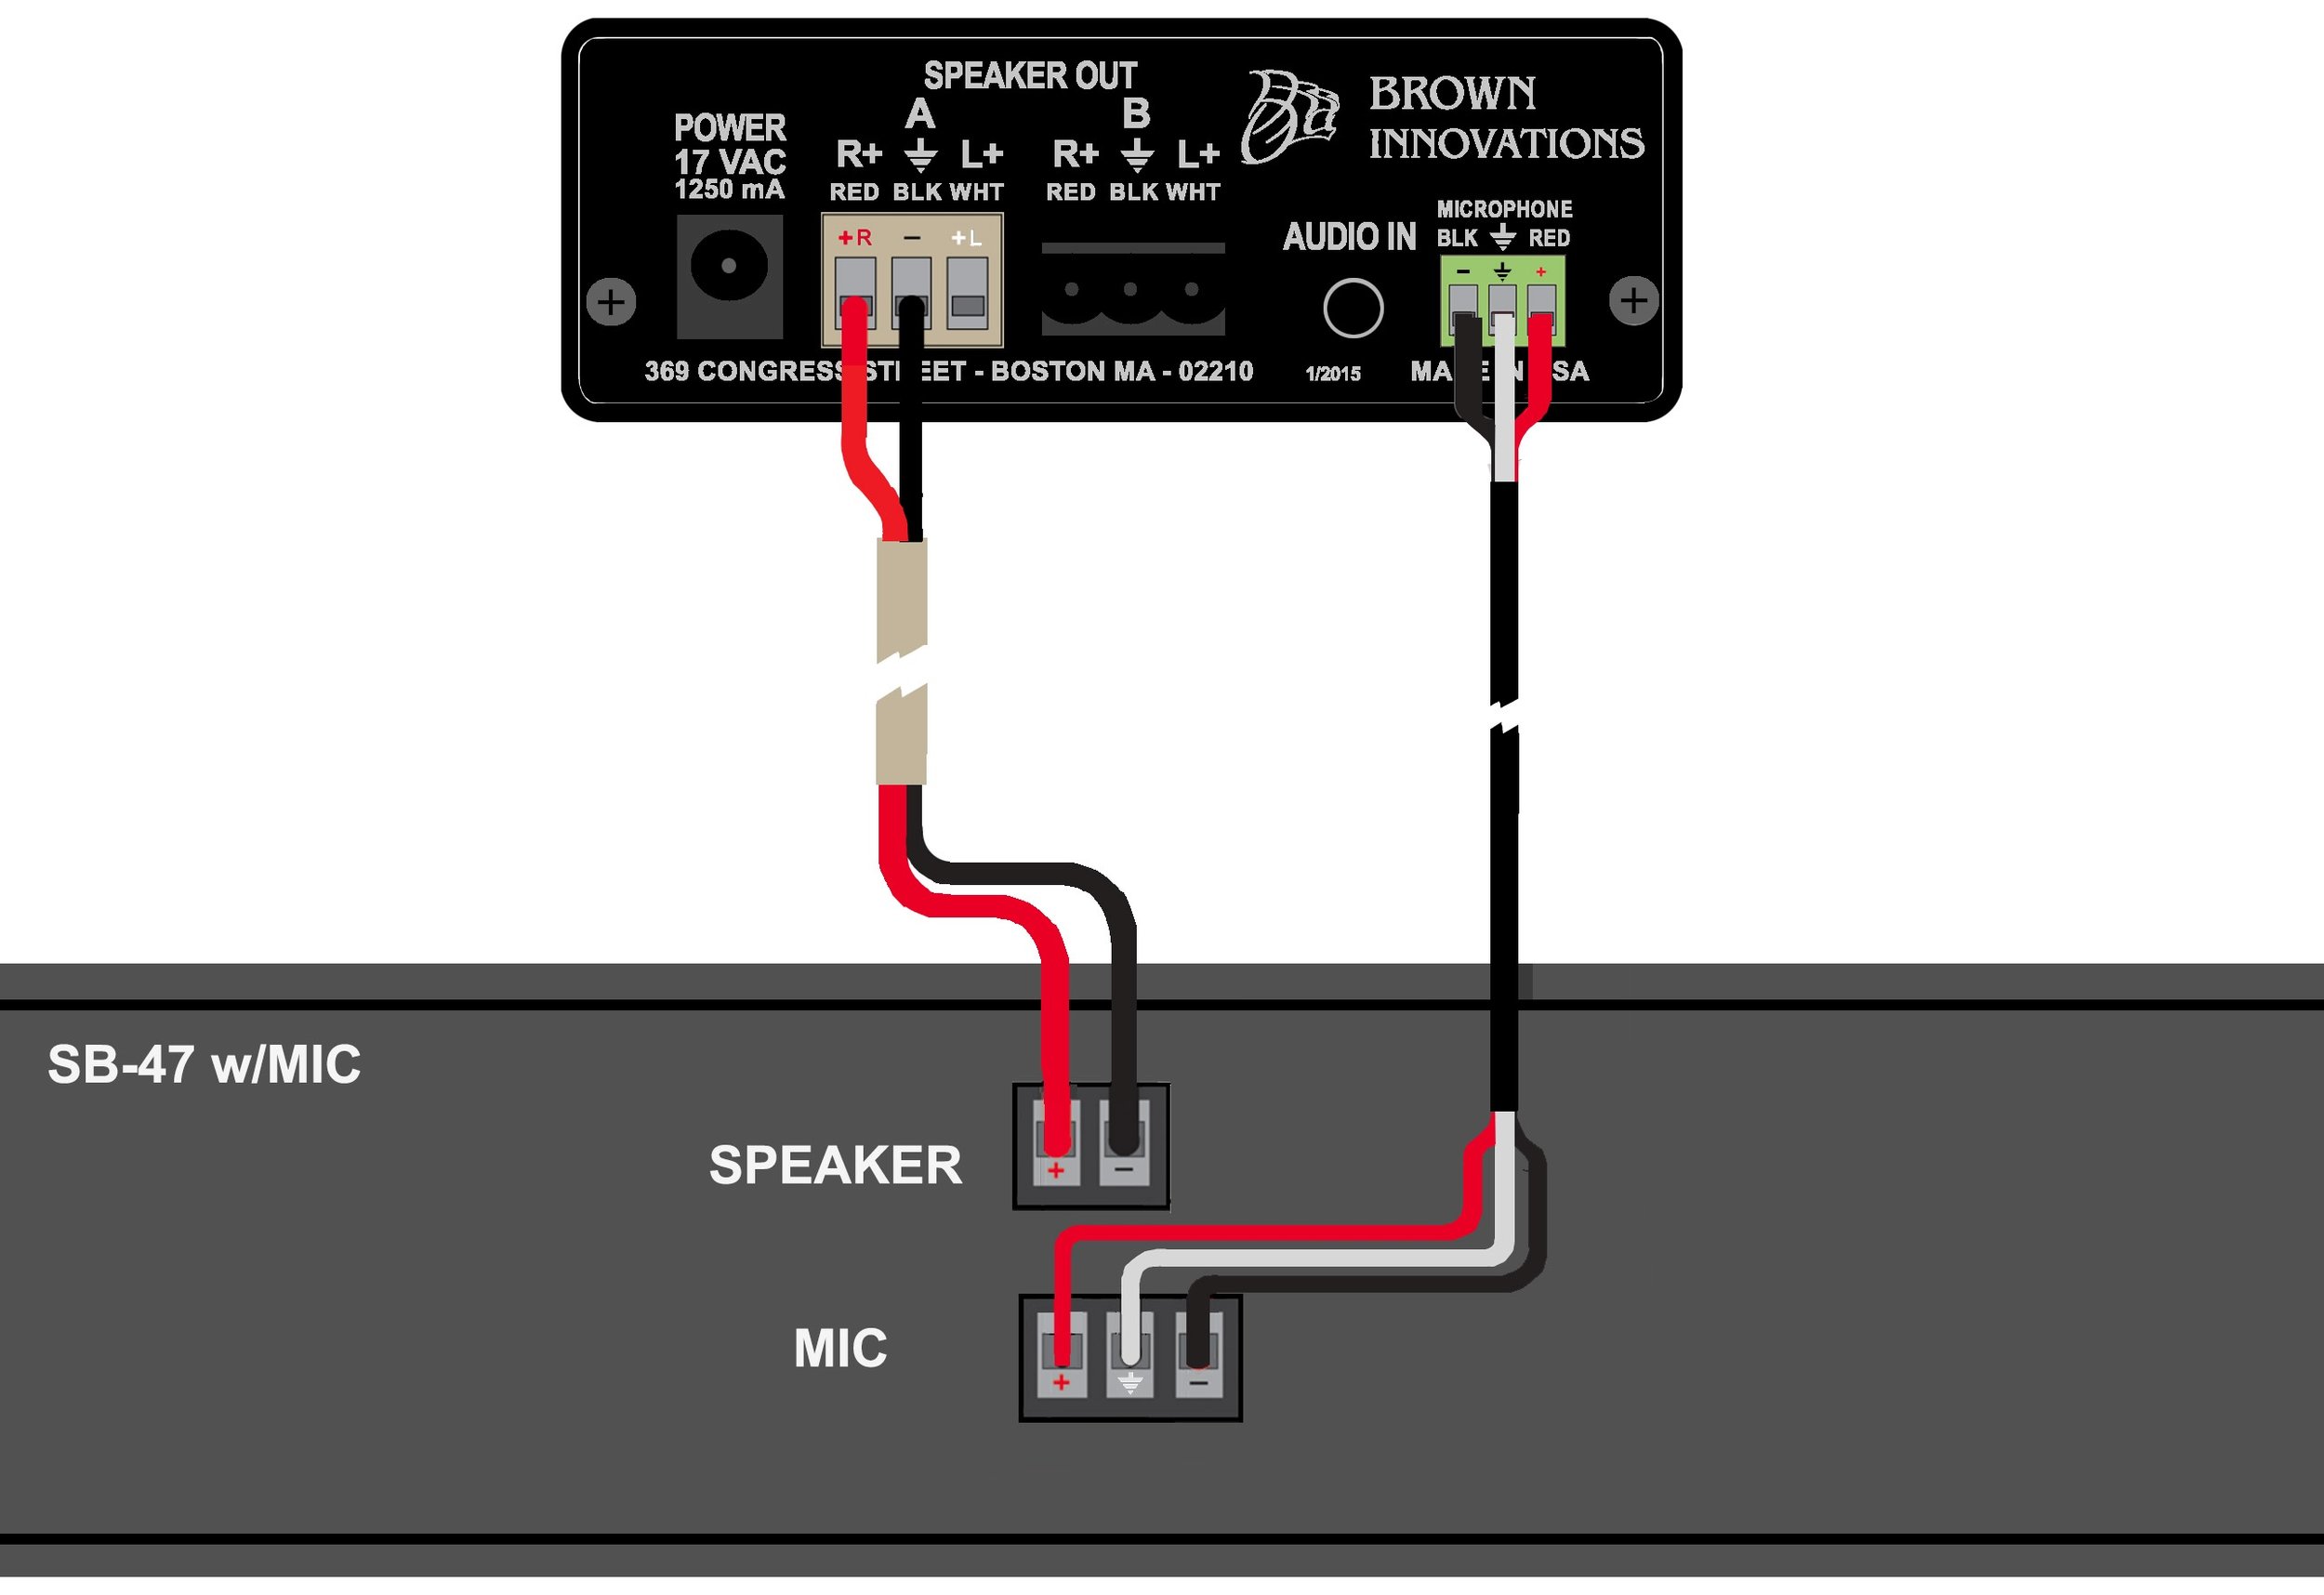
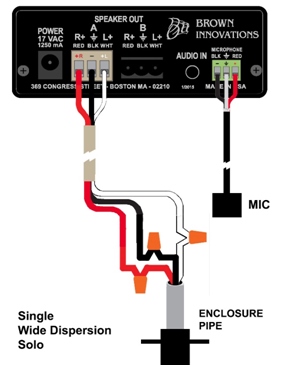
The Myriad is designed to be connected to Brown Innovations Speakers. For speakers that have three conductor terminals connect the right positive terminal to the R+ terminal (mark in red) on the Myriad. The negative terminal on the speaker should be connected to the negative or ground terminal (mark in black). Connect the left positive third terminal to the left positive terminal marked in white. For speakers that have only two conductors connect only the right positive and ground connections on the Myriad. For speakers with microphones or sensors please use the provided shielded cable or equivalent wire for proper performance. Follow the color code and connect the appropriate terminal on the speaker to the appropriate terminal on the Myriad.
For SB-24 and SB-40:

For SB-18 and SB-47 :
For Mini Localizer, Single Localizer and Wide Dispersion Localizer:

Next, from your audio player plug the 3.5mm stereo Male end of your Audio Cable into the jack marked ‘AUDIO IN’ on the Myriad. Optionally plug a USB cable from your computer to the front of the Myriad amplifier. The USB connection is for adjusting the Myriad SmartVolume or sensor software only. There is no audio over USB capability.

Finally plug the Brown Innovations Power Supply into the jack marked ‘POWER.’
3.3 SD Card Audio
The Myriad amplifier can be factory programmed to play audio directly from a micro SD card. The audio file on the micro SD needs to be formatted to a 48kHz stereo 16bit wav file. Name the audio file "loop.wav" and load it onto the micro SD card. Insert the micro SD card into the slot on the Myriad.
3.4 Setting the Volume Offset
In Stand Alone Mode only the Volume Offset needs to be set. This adjustment is done using the potentiometer, or pot, on the front panel of your Myriad. The output of the Myriad raises and lowers depending on the ambient level of the surrounding environment. As the ambient noise level changes the Myriad will adjust automatically, providing a focused intelligible sound field directly in front of the speaker. How high the Volume Offset is set will dictate how well the speaker contains the sound.
Volume Offset Adjustment: Have a test subject stand in line with the front of the focused speaker. Raise or lower the Volume Offset to a level that barely has 100% intelligibility. This level should be just above the surrounding ambient noise. The Volume Offset should be set at a time when there is an average to high level of ambient noise. Pink noise can be used to simulate these higher levels of ambient noise. A fan or vacuum cleaner can also be used to simulate high levels of ambient noise. A good way to test your Volume Offset setting is to walk to the side away from the center of the speaker. The audio heard from the speaker should blend into the noise of the environment.
Chapter 4: Graphic User Interface Mode
4.1 Introduction
The Myriad can be easily adjusted to suit individual applications. The simplest way to adjust the Myriad is with the Baton software that is included with your speaker. The following chapter will explain loading the Baton software and Myriad drivers onto your PC. Baton was designed as an intuitive graphic user interface that lets you monitor several aspects of the Myriad’s operation and adjust these aspects according to your specific needs.
4.2 Compatibility
The Myriad is compatible with Microsoft WindowsXP and Windows7 operating systems. The Myriad connects via a USB 2.0 port. Please read through the following, step-by-step instructions carefully. If at any time you have questions about this procedure, please don’t hesitate to contact us.
4.3 Installing the Myriad Software
Before you connect the Myriad to your PC, you will need to pre-install the drivers and the Baton software. Make sure that your Myriad is not connected to your computer. Insert the Myriad CD and open the ‘USB_Driver’ folder. Click on the appropriate driver setup file. If your computer is a 32 bit machine click on the ‘VCP_V1.3.1_Setup’ file. For 64 bit computers click on the ‘VCP_V1.3.1_Setup_x64’ file. The InstallShield Wizard will open. This will take you through the Myriad driver installation procedure.

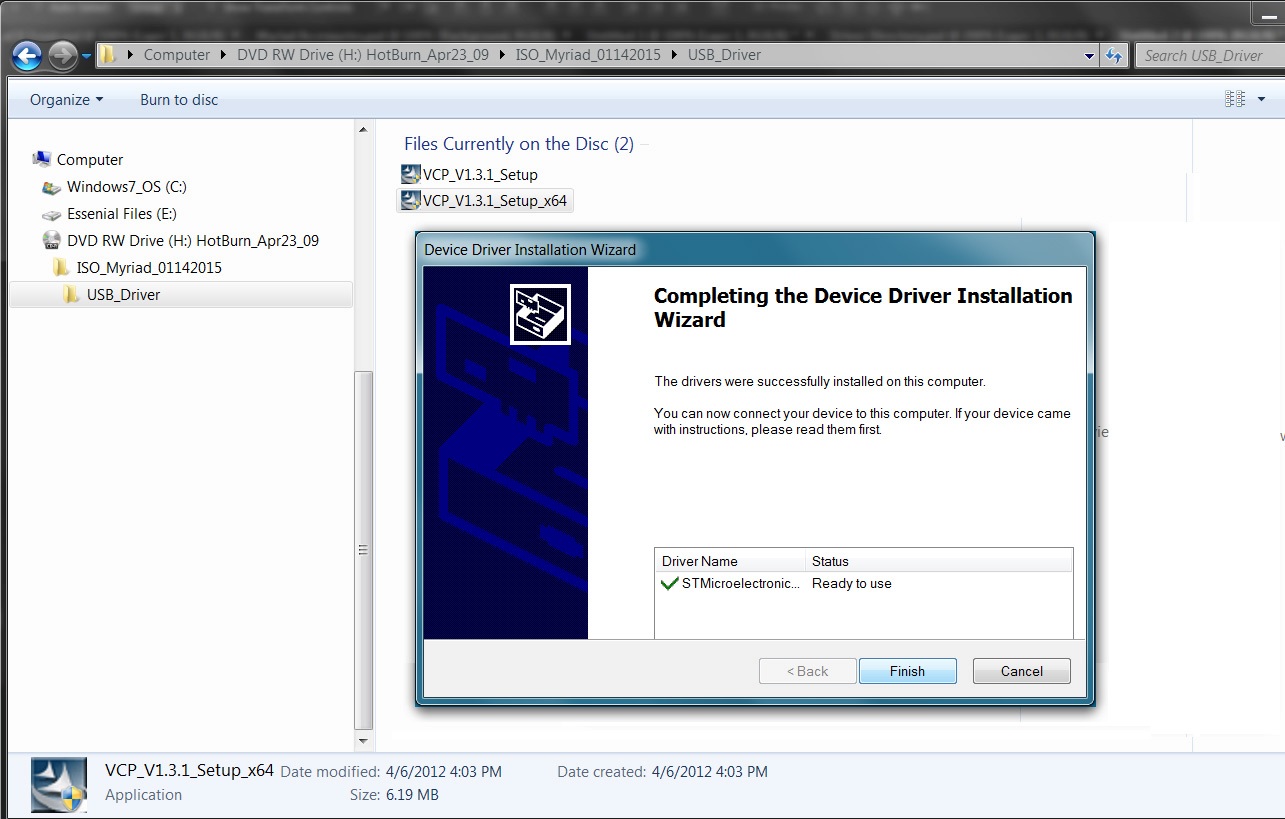
When the InstallShield Wizard is complete click on the ‘Finish’ button.

Once the Myriad drivers are successfully installed your computer can communicate with the Myriad amplifier. This communication is made easy using our Baton software. Baton can be run off the CD or the application can be copied to a directory on your computer and run from there.
4.4 Connecting the Myriad to Your Computer
Connect the Myriad to your speaker and to power as described in chapter 3.2. Check to make sure that the LED located on the front of the Myriad is lit red (green when audio is playing). Next, connect your PC to your Myriad via a USB Cable. The mini USB connector is located on the front panel of the amp.

4.5 Using the Myriad Baton
First, open the Myriad Baton program:
Important: Changes made to the Myriad with the Baton software are saved in the amplifier itself not in the Baton software. When Baton is closed, the computer is shut off or power to the Myriad is unplugged the changes made will remain on the amplifier.
4.6 Setting-Up Your Myriad Using the Baton Software
The following section will explain the necessary steps for setting up your Myriad in order for it to perform optimally. You will choose your Reference Track, set Volume Offset, and set Response Time.
4.6.1. Choose An Audio Track
If there are multiple audio tracks choose one that best represents the average volume of those tracks. This track will be referred to as your “Reference Track.”
4.6.2 Set Volume Offset
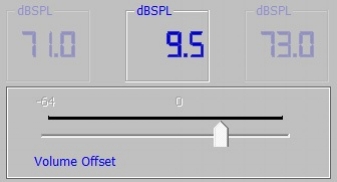
The output of the Myriad raises and lowers depending on the ambient level of the surrounding environment. As the ambient noise level changes the Myriad will adjust automatically, providing a focused intelligible sound field directly in front of the speaker. How high the Volume Offset is set will dictate how well the speaker contains the sound.
Volume Offset Adjustment: Have a test subject stand in line with the front of the focused speaker. Raise or lower the Volume Offset to a level that barely has 100% intelligibility. This level should be just above the surrounding ambient noise. The Volume Offset should be set at a time when there is an average to high level of ambient noise. Pink noise can be used to simulate these higher levels of ambient noise. A fan or vacuum cleaner can also be used to simulate high levels of ambient noise. A good way to test your Volume Offset setting is to walk to the side away from the center of the speaker. The audio heard from the speaker should blend into the noise of the environment.
4.6.3 Set Response Time

To set Response Time move slider to desired setting. Response time controls how quickly the Myriad will respond to the changes in ambient levels of noise. The Myriad can only respond to ambient levels during very quiet passages in the program, or if the mute is engaged. If your audio program has a very short time between tracks (less than a second) the response time should be set high, 5dB/s to 10dB/s. If you have more time between tracks (i.e. 10 seconds of silence within five minutes of a program) the Response Time can be set at 1.0 dB/s. If you have time between tracks and only wish to have the Myriad adjust to slow trends in ambient levels through out the day set the Response Time at 0.3dB/s or below. Higher Response time allows for quicker response to changing levels but also can react to single outbursts of sound. Slower Response Time allows for a smoother more gradual change in levels but will take longer to react.
4.7 Other Baton Controls
4.7.1
Checking the ‘Mute’ box will mute the audio signal. Along with quiet passages in the audio, whenever the mute is engaged, the Myriad will read ambient noise levels. These levels are displayed under the ‘Amb’ button.
4.7.2 Smart Volume
Checking the ‘Smart Volume’ box will enables the Myriad’s automatic volume adjustment function. De-selecting ‘Smart Volume’ will cause the Myriad to operate as a typical amplifier and the ‘Volume Offset’ will function like a standard volume control.
4.7.3 Pot
Check the ‘Pot’ box to enable the volume knob (potentiometer) on the Myriad. If the ‘Smart Volume’ box is also checked the volume knob will function as the Volume Offset controller. The internal Volume Offset value in the Myriad will be automatically disabled when Pot is selected. In this way, you can manually control the Volume Offset when the Myriad is not connected to your computer, or if you are not running the Baton software.
4.7.4 Audio Indicator
Green light indicates that the Myriad is recognizing audio input.
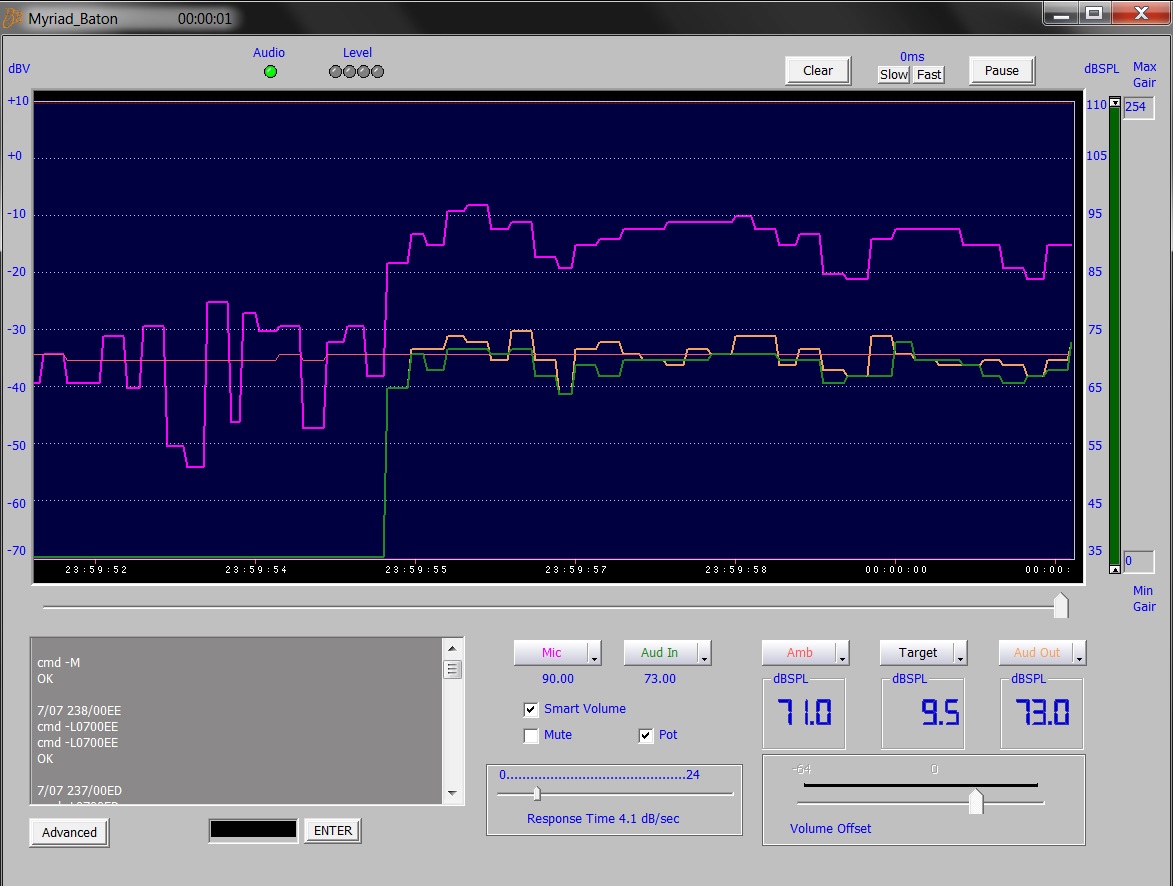
4.7.5 Graphing Screen Speed Controls

The ‘Slow’ and ‘Fast’ control buttons change the speed of the graphic display. Changing the speed of the display does not affect the function or settings of the Myriad. Pressing the ‘Clear’ button will clear the graphical display. Pressing the ‘Pause’ button will freeze the display. Pressing it again will cause the display to move.
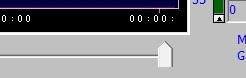
Using the slider at the bottom of the screen allows you to look back in time to the graph that was previously displayed. The maximum window to look back in time at regular speed is 45 seconds. Longer times can be reviewed by slowing down the display with the ‘Slow’ button.
4.7.6 Maximum Gain

Use the vertical slider to adjust the absolute maximum volume that the Myriad will output. The Myriad’s volume will not rise above this level, regardless of ambient noise conditions or other volume controls i.e., Target and Volume Offset.
4.7.7 Minimum Gain

Use the vertical slider to adjust the absolute minimum volume the Myriad will output. The Myriad’s volume will not fall below this level, regardless of ambient noise conditions or other volume controls i.e., Target and Volume Offset.
4.7.8 Microphone Level

Select ‘MIC’ to track the microphone input level. Microphone Level will be displayed in magenta on the Graphing Display. The displayed MIC level represents real time microphone measurements.
4.7.9 Audio Input Level

Select ‘Aud In’ to track the Audio Input signal. ‘Aud In’ indicates the level of the audio signal before processing and volume adjustment. Audio Input will be displayed in green on the Graphing Display. The Audio Input is displayed using a dBV scale (shown on the left side of the graph) Audio Input is the only data shown in dBV (all others are shown in dBSPL) The Audio Input level is only effected by changes made to the Output Correlation value.
4.7.10 Ambient Noise Level

Select AMB to track the Ambient Noise Level in the area around the Myriad. The AMB (dBSPL scale) will be displayed in orange on the Graphing Display and below the AMB button. The Myriad monitors ambient noise levels constantly, but will only use information from the ambient noise level during lulls and pauses in the audio track or when the mute is engaged. When the Myriad is using the ambient noise level to adjust the output volume the AMB line will be solid and the number below will vary. When the Myriad is not adjusting the AMB line will be dashed, the number below will be fixed and the box will be blue. The AMB is computed using the Microphone Level and the Response Time setting.
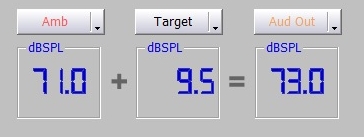
4.7.11 Target Level
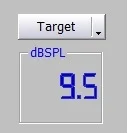
Select ‘Target’ to track the adjustments being made to the output volume of the Myriad as it responds to the ambient noise level. Target Level will be displayed in blue on the Graphing Display. Target Level is the Ambient Noise Level plus the Volume Offset. The number displayed below the Target is the selected Volume Offset.
4.7.12 Audio Output Level

Select AudOut to track the audio output signal. AudOut indicates the level of the audio program after signal processing and volume adjustment. The Audio Output Level will be displayed in yellow on the Graphing Display. The Audio Output Level is a computed value representing the sound pressure levels one meter directly in front of the Myriad.
The Audio Output Level should correspond to the Ambient Noise Level plus the Volume Offset (Target). The Audio Output Level will deviate from the Target when an audio track is played whose level is different from the Reference track. (See section 4.6) The Audio Output Level is a function of the Audio Input Level, the Ambient Noise Level, the Volume Offset Level, and the Response Time.
4.7.13 Information Box
This box displays useful information about your Myriad including:
- The Com Port of your computer that is connected to the Myriadbv
- The Serial Number of the Myriad amplifier
- The Software Revision and Port
- The Firmware Revision.
- ASCII communication when using the Enter box (see below)
4.7.14 Enter

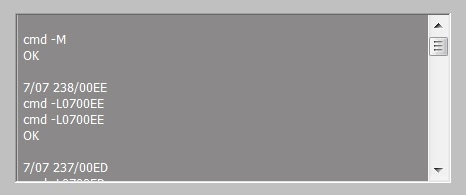
Those familiar with ASCII code can enter commands manually in the Enter box. See Chapter 5 for more information about communicating directly with the Myriad, including a list of ASCII commands.
Chapter 5. Operations: Direct Communication Mode
5.1 Introduction
Users may communicate directly with the Myriad via the virtual serial port using ASCII command strings. Multiple Myriads can be networked and controlled from a single terminal. Skilled users may incorporate Myriad communication into their own programs or databases by utilizing the associated ASCII commands.
5.2 Communication and Command Protoco
Command: “cmd –M\r” Mute On
Response: “OK\n\r”
Command: “cmd –m\r” Mute Off
Response: “OK\n\r”
Command: “cmd –V\r” Smart Volume On
Response: “OK\n\r”
Command: “cmd –v\r” Smart Volume Off (Direct Mode)
Response: “OK\n\r”
Command: “cmd –R\r” POT inactive
Response: “OK\n\r”
Command: “cmd –r\r” POT active
Response: “OK\n\r”
Command: “cmd –z\r” Save current configuration
Response: “OK\n\r”
Command: “cmd –0\r” Get Current Status Information
Response: “V0000 xxxxabc d e…\n\r”
Where,
xxxxà sequence number
a à current mic reading in dBSPL (decimal value)
b à current ambient level in dBSPL (decimal value)
c à current input signal level dbv (decimal value)
d à current output level in dBSPL (decimal value)
e à current pot level in dBSPL (decimal value)
Command: “cmd –1\r” Get Current Status Information
Response: “V0000 xxxxabc d e f g h i j k…….\n\r ”
Where,
xxxxà sequence number
a à mute status 1=ON (muted) 0=OFF (unmuted)
b à smart volume sw 1=ON (sv mode) 0=OFF (direct mode)
c à pot sw 1=Pot active 0=Pot Inactive
d à Smart Volume Register value
e à Direct Volume Register value
f à Current Pot reading
g à Minimum Level Register value
h à Maximum Level Register value
i à Response timer Register value
j à Maximum Level Register value
k à Response Time Register value
….………………….
Command: “cmd –t\r” Get Current Status Information
Response: “Mic=xx inp=xx out=xx amb=xx aud=x……\n\r”
Where,
Mic = xx is the current Mic reading in dBSPL
Inp = xx is the audio input level in dbv
Out = xxis the audio output level in dBSPL
Amb = xx is the current Ambient level in dBSPL
Aud = xis 0 or 1 indicating if Input Audio is present or not
….………………….
Command: “Laa00dd” load Register “aa” with data “00dd”
Response: “OK\n\r”
Command: “Qaa” read Register “aa”
Response: “00dd OK\n\r”
Command: “qY” Query Firmware Information
Response: : “………………\n\r” returns Firmware Information
Chapter 6. Cleaning and Maintenance
WARNING! When cleaning your Myriad speaker system always observe all safety warnings and safe electrical practices.
The Myriad speaker is airtight and requires no internal maintenance or cleaning. There are absolutely no serviceable parts inside. Do not attempt to open the enclosure. Tampering with your Myriad's enclosure will immediately void the warranty.
If your myriad requires cleaning for any reason, most generic plastic cleaners will provide satisfactory results. As with all electrical equipment always disconnect operational power before cleaning. As a precaution, disconnect all computer and audio connections before cleaning. Apply plastic cleaner to a clean dry rag and wipe dust and debris from the amplifier's surface. NEVER spray any liquid directly onto the amplifier's enclosure.