The Maestro Directional Speaker
Automatic Volume Adjustment Directional Speaker System
Chapter 1. About Your Maestro
1.1 Introduction
The Maestro is a state of the art intelligent directional speaker that adapts to its operating environment. This product has been designed for flexibility of use and ease of installation; use the default settings built into the speaker or customize the Maestro’s responses using the Baton software. The Maestro can be easily networked and communicated with remotely. The Maestro is a compact powered directional speaker system that incorporates a substantial amount of high-tech features. A discreet, built-in omni-directional microphone monitors the ambient noise levels in the surrounding area and a microcontroller automatically adjusts the volume of directional sound. Seven separate speakers are used to direct and provide full fidelity audio reproduction. Audio compression and active loudness ensure that your audio presentation is heard clearly when ambient noise levels around the presentation change.
2.1 Unpacking and Inspection
Be sure that you have the following before you begin setting-up your directional speaker:

1 - Maestro Speaker System a)
1 - Software Installation CD b)
1 - Brown Innovations Power Supply (17Vac @ 1240mA). * c)
1 - USB Cable d)
1 - Audio Cable (Stereo Mini to RCA) e)
1 - 3/32” Allen Wrench f)
4 - 1/4 – 20 x 1 1/2” Threaded Rods g)
*WARNING: Do not operate the Maestro with any other power supply!To do so could damage the unit and immediately renders the warranty void.
4 - 1/4 – 20 Hex Nuts h)
2.2 Mounting
There are several options for mounting your Maestro directional speaker system.
The simplest way is to utilize the threaded inserts located at the top of the unit to mount the Maestro directional speaker underneath your plasma screen display. The threaded rods and nuts were included for this purpose.
The Maestro can also be wall mounted by utilizing the optional ‘U-Bracket’ (U-Bracket sold separately). We can also design and manufacture a custom mounting system to fit your specific needs.


Note: When making a decision as to the best way to mount your Maestro, it is important to note that the subwoofer is located on the BOTTOM of the unit. Be sure that this is not obstructed in any way, or your Maestro directional speaker will lose bass response.
Chapter 3. Operation: Stand Alone Mode
3.1 Introduction
Your Maestro comes from the factory ready to connect to an audio source with no additional programming. The default presets are designed to accommodate the majority of operating environments. This mode of operation is referred to as Stand Alone Mode. After making the proper connections, the only thing you need to do is set your desired Volume Offset using the potentiometer (volume knob) located on the back panel of the Maestro.
3.2 Connections
In Stand Alone Mode, all you need to do is plug in the Audio Cable, and the Power Supply and your Maestro is ready to use.
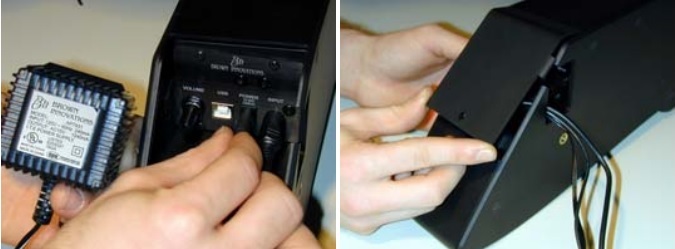
First, use the Allen Wrench to remove the back panel of your directional speaker.
Next, plug the RCA Male end of your Audio Cable into the RCA female jack marked ‘INPUT’ on the Maestro.

Finally plug the Brown Innovations Power Supply into the jack marked ‘Power.’ Replace the back panel with wires sticking out of the slot on the top of the unit.
3.3 Setting the Volume Offset
The only thing you need to set in Stand Alone Mode is the Volume Offset. This is done using the potentiometer, or pot, marked ‘Volume’ on the back panel of your directional speaker. The two basic concepts that need to be understood when setting Volume Offset are:
• The directional audio volume of the Maestro raises and lowers depending on the ambient level of the surrounding environment.
• As the ambient noise level changes the Maestro will adjust automatically, providing a constant intelligible sound field a predetermined distance from the Maestro. How high the Volume Offset is set will dictate how far from the Maestro the sound is focused.
To set this distance: Have a test subject stand at the maximum distance of the desired sound field. Raise or lower the Volume Offset to a level that is just above the surrounding ambient noise. Remember this is the outer edge of your sound field, within it; the track will be perfectly audible. Volume Offset should be set at a time when there is an average to high level of ambient noise. A good way to test your Volume Offset is to walk backward away from the Maestro and see at which point the Maestro audio blends into the noise of the environment. As a rough guide for setting the Volume Offset refer to the figure below.

Chapter 4. Operation: Graphic User Interface Mode
4.1 Introduction
Your directional speaker can be easily adjusted to suit individual applications. The simplest way to make adjustments is with the Baton software that is included with your speaker. The following chapter will explain loading the Baton software and Maestro drivers onto your PC. These will be referred to as the Maestro System. Baton was designed as an intuitive graphic user interface that lets you monitor several aspects of the Maestro’s operation and adjust these aspects according to your specific needs.
4.2 Compatibility
The Maestro connects via a USB 2.0 port. If you do not have a USB 2.0 port on your computer, they are readily available at most retailers that carry computer accessories. Please read through the following, step-by-step instructions carefully. If at any time you have questions about this procedure, please don’t hesitate to contact us.
4.3 Installing the Maestro System Software
Before you connect the directional speaker to your PC, you will need to pre-install the drivers and the Baton software. Insert the Maestro CD and open the ‘Setup’ folder. Click on the ‘Maestro Setup’ icon. The Maestro Setup Wizard will open. This will take you through the Baton software and Maestro driver installation procedure.

Make sure all other applications are closed and click ‘Forward.’

When you have finished reading the License Agreement, select ‘I accept the agreement,’ and click ‘Forward.’

Make sure that your Maestro is not connected to your computer. If it is, please disconnect. Click ‘Forward.’

The Setup program will automatically create a folder for your Maestro. To choose a different location, click ‘Browse,’ and select the folder you wish to install the Baton software and Maestro drivers. Click ‘Forward.’

If you would like to create a shortcut to the Baton software on your desktop, select the ‘Create a desktop icon.’ Click ‘Forward.’

At this time you are ready to install the Maestro software. If you would like to review or change any settings click ‘Back.’ To continue with the installation click ‘Install.’
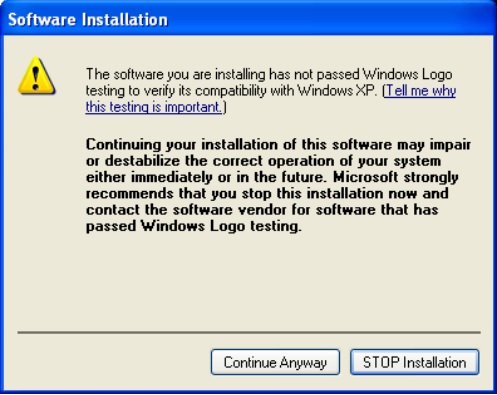
Click ‘Continue Anyway.’ (This message appears because Brown Innovations has not yet submitted The Maestro software for certification in Microsoft’s voluntary logo program.)

At this time, you have successfully installed the Maestro System. Please select the ‘View Readme.rtf’ to review important information about your directional speaker. Click ‘Finish.’ Once the software and the drivers are installed, you can connect the Maestro Speaker to your computer. 4.4 Connecting the Maestro to Your Computer Remove the back panel (as illustrated in section 3.2). Unplug any connections that you may have previously made. Connect ONLY the Brown Innovations Power Supply—DO NOT MAKE ANY OTHER CONNECTIONS AT THIS TIME. Ideally, you should use an electrical outlet that has nothing else plugged into it. Check to make sure that the LED located farthest left on the front of the Maestro directional speaker is lit. Next, connect your PC to your Maestro via a USB Cable.
4.4 Connecting the Maestro to Your Computer
Remove the back panel (as illustrated in section 3.2). Unplug any connections that you may have previously made. Connect ONLY the Brown Innovations Power Supply—DO NOT MAKE ANY OTHER CONNECTIONS AT THIS TIME. Ideally, you should use an electrical outlet that has nothing else plugged into it. Check to make sure that the LED located farthest left on the front of the Maestro is lit. Next, connect your PC to your Maestro via a USB Cable.

Note: It is O.K. for other LED’s to be lit, just as long as the LED farthest to the left is one of them. If only the two center LED’s are lit, you do not have ample power. Please try another outlet.
4.5 Using the Maestro Baton
Open the Maestro Baton program.

Important: Changes made to the Maestro with the Baton software are saved in the speaker itself not in the Baton software. When Baton is closed, the computer is shut off or power to the Maestro is lost, changes made will remain on the speaker.
4.6 Setting up your Maestro using the Baton Software
The following section will explain the necessary steps for setting up your Maestro in order for it to perform optimally. You must choose your Reference Track, set Output Correlation, set Volume Offset, set Response Time and set the Woofer Level.
1) Choose an audio track. If there are multiple audio tracks choose one that best represents the average volume of those tracks. This track will be referred to as your “Reference Track.”
2) Set Output Correlation. Play the Reference Track to set Output Correlation. Move the slider so that on average the target line (blue) and the output line (yellow) are lined up.

3) Set Volume Offse

The two basic concepts that need to be understood when setting Volume Offset are:
• The volume of the Maestro raises and lowers depending on the ambient level of the surrounding environment.
• As the ambient noise level changes the Maestro will adjust automatically, providing a constant intelligible sound field a predetermined distance from the Maestro. How high the Volume Offset is set will dictate how far from the Maestro the sound is focused.
To set this distance: Have a test subject stand at the maximum distance of the desired sound field. Using the slider, raise or lower the Volume Offset to a level that is just above the surrounding ambient noise. Remember this is the outer edge of your sound field, within it; the track will be perfectly audible. Volume Offset should be set at a time when there is an average to high level of ambient noise. A good way to test your Volume Offset is to walk backward away from the Maestro and see at which point the Maestro audio blends into the noise of the environment. As a rough guide for setting the Volume Offset refer to the figure below.

4) Set Response TIme
To set Response Time move slider to desired setting. Response time controls how quickly the Maestro will respond to the changes in ambient levels of noise. The Maestro can only respond to ambient levels during quiet passages in the program, or if the mute is engaged. If your audio program has a very short time between tracks (less than a second) the response time should be set high, 200 or higher. If you have more time between tracks (i.e.-10 seconds of silence within five minutes of a program) the Response Time can be set at 150-200. If you have time between tracks and only wish to have the Maestro adjust to slow trends in ambient levels through out the day set the Response Time at 150 or below. Higher Response time allows for quicker response to changing levels but also can react to single outbursts of sound. Slower Response Time allows for a smoother more gradual change in levels but will take longer to react.
5) Set Woofer Level
Use slider to adjust the Woofer output level. Lower frequencies are difficult to focus but are a necessity for full fidelity. The Woofer setting will be a balance between the directionality of the speaker and the fullness of the track. Woofer level is best set by dropping the woofer level to zero and slowly raising it until there is a balance between fidelity and localization of the track.
4.7 Other Baton Controls
Mute - Mutes the audio signal. Whenever the mute is engaged the Maestro will read ambient noise levels.
Smart Volume - Enables the Maestro’s automatic volume adjustment function. De-selecting Smart Volume will cause the Maestro to operate as a typical powered speaker.
Pot - Select Pot to enable the Volume Knob (Potentiometer) on the Maestro. At this point, the Volume Knob will function as the Volume Offset controller. The Volume Offset slider in the Baton will be automatically disabled when Pot is selected. In this way, you can manually control the Volume Offset when the Maestro is not connected to your computer, or if you are not running the Baton software.
Audio Indicator - Green light indicates that the Maestro is recognizing audio input.
Power Indicator - Green light indicates that the Maestro is sufficiently powered.
Audio Level Indicator - Yellow lights emulate the LED’s on the front of your Maestro speaker. The LED’s represent the relative speaker output.
Graphing Screen Speed Controls - Slows down the graphic display. Changing the speed of the display does not affect the function or settings of the Maestro.
Pause - Select Pause to freeze the graphic display.
Maximum Gain - Use the vertical slider to adjust the absolute maximum volume that the Maestro will output. The Maestro’s volume will not rise above this level, regardless of ambient noise conditions or other volume controls i.e., Target and Volume Offset.
Minimum Gain - Use the vertical slider to adjust the absolute minimum volume the Maestro will output. The Maestro’s volume will not fall below this level, regardless of ambient noise conditions or other volume controls i.e., Target and Volume Offset.
Microphone Level - Select MIC to track the microphone input level. Microphone Level will be displayed in magenta on the Graphing Display. The displayed MIC level represents real time microphone measurements.
Audio Input Level - Select Aud In to track the Audio Input signal. Aud In indicates the level of the audio signal before processing and volume adjustment. Audio Input will be displayed in green on the Graphing Display. The Audio Input is displayed using a dBV scale (shown on the left side of the graph) Audio Input is the only data shown in dBV (all others are shown in dBSPL) The Audio Input level is only effected by changes made to the Output Correlation value.
Ambient Noise Level - Select AMB to track the Ambient Noise Level in the area around the Maestro. The AMB (dBSPL scale) will be displayed in orange on the Graphing Display and below the AMB button. The Maestro monitors ambient noise levels constantly, but will only use information from the ambient noise level during lulls and pauses in the audio track or when the mute is engaged. When the Maestro is using the ambient noise level to adjust the output volume the AMB line will be solid and the number below will vary. When the Maestro is not adjusting the AMB line will be dashed, the number below will be fixed and the box will be blue. The AMB is computed using the Microphone Level and the Response Time setting.
Target Level
Select Target to track the adjustments being made to the output volume of the Maestro as it responds to the ambient noise level. Target Level will be displayed in blue on the Graphing Display. Target Level is the Ambient Noise Level plus the Volume Offset. The number displayed below the Target is the selected Volume Offset.
Audio Output Level
Select AudOut to track the audio output signal. AudOut indicates the level of the audio program after signal processing and volume adjustment. The Audio Output Level will be displayed in yellow on the Graphing Display. The Audio Output Level is a computed value representing the sound pressure levels one meter directly in front of the Maestro. The Audio Output Level should correspond to the Ambient Noise Level plus the Volume Offset (Target). The Audio Output Level will deviate from the Target when an audio track is played whose level is different from the Reference track. (See section 4.6) If the Audio Output Level is consistently above or below the Target, the Output Correlation may need to be adjusted. The Audio Output Level is a function of the Audio Input Level, the Ambient Noise Level, the Volume Offset Level, the Output Correlation, the Response Time and the Woofer Level.
Set Default Values
Select Set Default Values to reset the Maestro to default operating parameters. Default Values are established by the Baton program.
Information Box
This box displays useful information about your Maestro including:
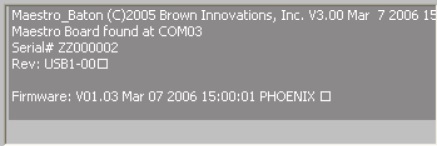
• The Com Port on your computer that the Maestro is connected.
• The Serial Number of the Maestro directional speaker
• The Software Revision and Port. (USB or Serial)
• The Firmware Revision.
• ASCII communication when using the Enter box (see below)
Enter
Those familiar with ASCII code can enter commands manually in the Enter box. See here for more information about communicating directly with the Maestro, including a list of ASCII commands.